ACFM(Alternating current field measurement)交流电磁场检测技术是一种新型的无损检测和诊断技术,用于检测金属构件表面和近表面的裂纹缺陷,可以测量裂纹的长度和计算裂纹深度,具有非接触测量、受工件表面影响小的特点。该检测技术在海上设施的水下无损检测中愈来愈广泛的应用。
背景
在海洋石油和天然气装置的水下结构和海上平台设备的检测中,由于被检对象和环境的特殊性,使得常规检测方法出现漏判、误判的概率大大增加,造成巨大的经济损失和环境污染,例:在1977 到1998 年间,加拿大发生了20 起天然气管道事故,其中9 起泄漏,11 起破裂,均是由应力腐蚀裂纹(SCC-Stress Corrosion Crack)引起。并且,随着在役管道结构的继续老化,发生事故的潜在可能性加大。ACFM 技术就是在这种情况下产生,它由交变电压降((ACPD-Alternating Current Potential Drop)技术发展而来,结合了ACPD 技术的无需校准测量和涡流检测的无接触的优点,是精确测量表面裂纹的无损检测方法之一。
在二十世纪八十年代后期,ACFM 技术首先被用于水下结构关键部位焊缝质量的检验以及有表面涂层的金属结构的检验,1997 年巴西国家石油公司将ACFM技术用于海上石油平台的结构检验。随着对其不用去除涂层而实现表面疲劳裂纹检测的价值的认可及该技术进一步发展和成熟,开始被广泛地应用到石化、核工业、钢铁和铁路工业、土木结构比如桥梁检测、航空航天等领域中。
基本原理
ACFM技术的理论基础是电磁感应原理,一个通交变电流的特殊线圈(激励线圈)靠近导体时,交变电流在周围的空间中产生交变磁场,被测工件(导体)表面的感应电流由于集肤效应聚集于工件的表面。当工件中无缺陷时,感应电流线彼此平行,工件表面由于匀强磁场存在;若工件中油缺陷存在,由于电阻率的变化,势必对电流分布产生影响,电流线在缺陷附近就会产生偏转,工件表面的磁场就会发生畸变。这个磁场的变化强弱,就能反映出裂纹的尺寸。缺陷对电流及磁场的影响如图1-4所示。在工件表面产生的电磁场中,ACFM技术是检测感应磁场来检测裂纹,因为磁场渗透率强于电场,衰减慢于电场;其原理法拉第电动势原理:通电线圈(检测线圈)切割磁场产生电动势,检测此电动势即可检测感应磁场。
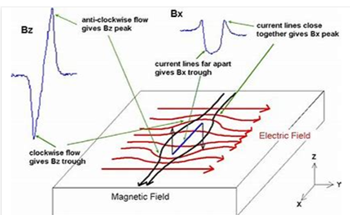
建立被测工件上的感应电流流向模型,并将磁场分量分成三个分量Bx(平行于工件表面并垂直于电流方向)、By(平行于电流方向)和Bz(垂直于工件表面)进行分析,如图1所示。当无缺陷时,感应电流顺着Y轴均匀流动, X向磁场分量(Bx)均匀无扰动,而另外两个方向的磁场分量(By和Bz)为0。故远离裂纹处,电流场是均匀的,电流相互平行。当电流流至裂纹处,由于材质的不均匀性和分界面处电流的连续性原理,电流线会向裂纹两端和裂纹底面偏转,使裂纹中心处电流线变疏,电流密度下降,两端的电流线汇聚,从而导致工件表面磁场的变化。
在ACFM的测量中,一般要测量出如下两个相互正交的磁场变化量:
- 垂直于工件表面的磁感应强度Bz,如图1所示,由于裂纹面上的电阻较大,使电流向裂纹两端和底面偏转。在裂纹的右半边,电流的总体趋势是顺时针方向,产生指向工件表面的磁力线;在裂纹左半边,电流的总体趋势是逆时针方向,产生指向工件底面的磁力线,规定前者为正,后者为负,如图1,这样就可以通过Bz测量出裂纹长度。
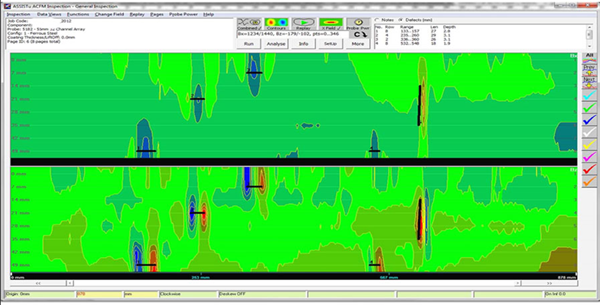
- 平行于工件表面和裂纹走向的磁感应强度Bx:如图1所示,由于电流向裂纹两端和底面偏转,使刘静裂纹面的电流强度下降,在裂纹中部,电流线最疏,Bx最小,Bx的极小值对应裂纹最深处,从而可以测出裂纹的深度。 ACFM技术是以可视化的方式向人们展示缺陷的存在,使人们对数据有更直观的理解。
Background
Alternating current field measurement is an electromagnetic technique that uses induced uniform currents and magnetic flux density sensors to detect and size surface breaking discontinuities without calibration. The term uniform means that, at least in the area under the probe, current lines (components of electric field intensity E) in the absence of a discontinuity are parallel, unidirectional and equally spaced (Ex = Ez = 0 and Ey = constant ≠ 0). In the 1980s, there were moves to develop nondestructive test techniques for detecting and sizing fatigue cracks underwater in welded offshore structures.
The development focused on two existing techniques — eddy current testing for detection and alternating current potential drop testing for sizing.
Conventional eddy current techniques were not particularly effective because of the scanning patterns needed across the weld and because of the signals received from the weld itself. The developments therefore concentrated on producing eddy current probes that could test the whole weld while being scanned only parallel to the weld. This was achieved by using arrays of coils covering the weld. To assist detection, because the probe was no longer being scanned across the weld toe (and hence the discontinuity), coils of more than one orientation were used to obtain signals from the ends of a discontinuity as well as the center. Both the induction coils and sensing coils were relatively large to give wide coverage rather than high sensitivity because there was no need to detect discontinuities less than 1 mm (0.04 in.) deep in the types of welds found underwater. The development emphasized detection of discontinuities and suppression of lift off effects. Crack depth had to be sized with calibration slots.
Principle of Operation
The alternating current field measurement technique involves inducing a locally uniform current into a test object and measuring the magnetic flux density above the test object surface. The presence of a surface breaking discontinuity perturbs the induced current and the magnetic flux density. Relative, rather than absolute, amplitudes of components of the magnetic flux density are used to minimize variations caused by material properties, instrument calibration and other circumstances. These relative amplitudes are compared with values in sizing tables produced from a mathematical model to estimate discontinuity sizes without the need for calibration using artificial discontinuities such as slots. This feature of alternating current field measurement is useful because calibration on slots is prone to error for several reasons.

 鲁公网安备 37020602000203号